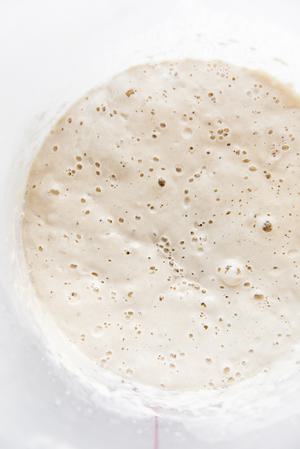
Before You Begin: Is Your Sourdough Starter Ready to Bake With?
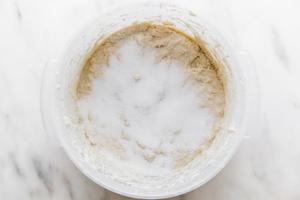
Because the sourdough starter is the yeast, the leavening agent, in this sourdough bread recipe—no commercial yeast needed!—you’ll need a very healthy, active sourdough starter before you set out to make sourdough bread. We’ve got a great recipe for making one at home here, but you can also ask your favorite bakery if they’ll give you some of theirs—they’ll often gladly share. So, before you begin to make bread, you’ve got to confirm that your starter is healthy and active. How do you do that? Well, if you’ve been feeding it regularly, you’ll know that your starter is ready to bake with when it reliably doubles in size within eight hours of feeding. This proves that the wild yeasts are active and happy, and that the starter has the strength to make your bread rise. And if you just need bread, stat, try herby Rhodes rolls.
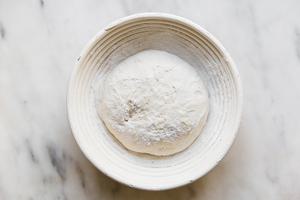
Step 1: Cultivate Those Wild Yeasts!
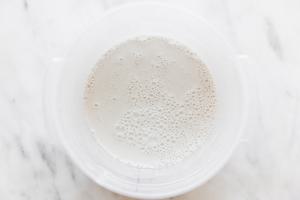
Your sourdough starter is bubbly and ready. Now, the bread-baking journey begins! We’re going to mix some flour and water into your sourdough starter—just as you do when you feed it, but in slightly different proportions—to make a sticky dough sometimes referred to as a “leaven” a “ pre-ferment” or “levain” depending on what cookbook you’re looking at. Confusing, right? Let’s just call it a pre-ferment, for the sake of simplicity and hope that the bread police don’t come looking for us! Our sourdough bread recipe takes two-to-three days, start-to-finish, and you’ll mix this flour + water + starter mixture on the evening of the first night. Taking this step means that you’ll only need a very small amount of that precious starter to make your sourdough bread dough rise. Be prepared to be amazed when you see how quickly the wild yeasts multiply, making a bubbly, happy, active leavener for your homemade bread!
Step 2: Autolyse
If you’ve ever read about sourdough bread before, you’ve probably come across the term “autolyse”. It sounds a little exotic and very mysterious, but don’t fret! We’re here to demystify everything about sourdough bread and that includes all of the confusing vocabulary words that bakers throw around. Alright, so what is autolyse? Autolyse means “to undergo autolysis” and autolysis is “the destruction of cells or tissues by their own enzymes, especially those released by lysosomes.”. OK, moving on!
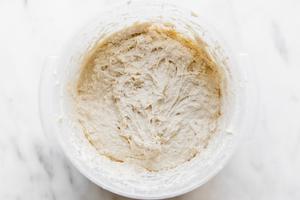
Just kidding. You’re still confused, right? So the autolyse is a rest period—a lot of recipes begin with a combination of just flour and water, and let those two ingredients rest together for a bit (usually about an hour) before proceeding to allow autolysis to occuse. We’re going to have you mix the pre-ferment (the super-starter you made on Day 1) into the flour and water before the autolyse—the initial rest period. This rest period allows the flour to hydrate more thoroughly, and will ultimately mean that you don’t have to do as much kneading as you would for a sourdough bread that skipped this step. Phew! OK, so autolyse=rest period. Got it?
After an hour, you’ll mix in the salt. Some recipes tell you to dissolve the salt in a little warm water, but we find that extra step to be unnecessary. Just sprinkle the salt on the top of the dough and gently fold it in. By adding it in later we are making room for more activity during the “rest period”.
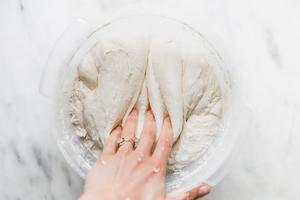
Step 3: Folding the Dough
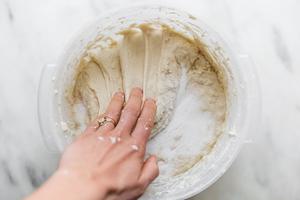
During this step we are strengthening the dough. Folding the dough onto itself a few times over the course of Day 2 serves two purposes! It distributes the yeast, and develops gluten. The first few (100+ times) we made this recipe, we were stretching the dough too much before folding it over onto itself. There’s no need to have a heavy hand here—gentle folding will do the job. Using wet fingertips—to avoid them sticking to the dough—reach into the bowl and grab one section of the dough from underneath, lift it up and let gravity do the work then fold the dough over itself toward its center. Rotate the bowl and grab the next section and repeat the fold. Rotate, fold, repeat. Do this about ten times, cover the bowl, and go do something else for about 30 minutes. Repeat. You’ll do this whole process, every 30 minutes, about 10 times throughout the day. Each time you handle the dough, you’ll find it’s smoother and stronger. Towards the end of your folding you’ll want to be more gentle then you were and first to avoid tearing the dough you’ve made so strong.

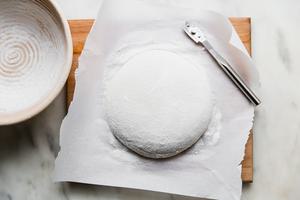
Step 4: Shaping the Dough
Despite its relative simplicity, shaping the dough seems to be a challenge for some. It may be that a little performance anxiety comes into play—we all want our loaves to look picture-perfect! But try not to stress. Just work slowly and have a light hand if you can. By shaping the dough, letting it rest, and shaping it again, we’re giving one last little bit of strength to the dough to help it achieve a really great “oven spring”, or height.
Step 5: The Slow Rise
Wild yeasts—the kind that you cultivated in your sourdough starter and the kind that, therefore, will make this loaf of bread rise—work more slowly than commercial yeast. So you’ll need to give this loaf a lot of time to rise. Now you’ve got a choice to make. Once you’ve moved your prepared loaf to it’s proofing basket or towel-lined colander, you’ll need to decide if you want to let it rise at room temperature for a couple of hours and bake it today, or let it rise slowly in the fridge for 12-24 hours and bake it tomorrow.
The long, slow fermentation in the fridge is our preferred method. You’ll let the shaped dough rest for an hour at room temperature, and then place it in the refrigerator overnight. There are a few reasons we prefer this. First, it’ll give the finished loaf of bread a more sour taste, because you’re giving the bacteria and wild yeasts in your bread dough that much more time to develop flavor-giving lactic and acetic acids. Secondly, it allows the gluten to break down more, creating a more digestible bread. Lastly, it is much easier to handle and score when preparing it for the oven. However, if you’re in a rush, you can bake the bread (after a few hours at room temperature) on the same day you make the dough.

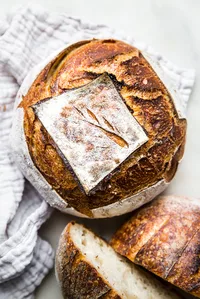
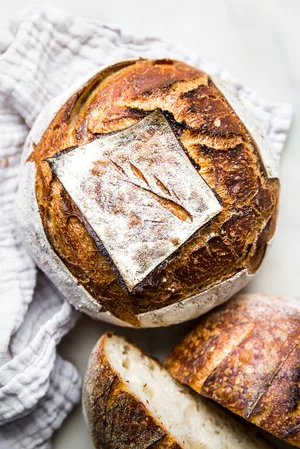
Step 6: Baking Your Bread in a Dutch Oven
Before you even ask, yes, you will need a Dutch oven and no, there is no good alternative. There are lots of inexpensive options out there that will do the job like this Lodge one, but if you have the extra cash, we love our Le Creuset. In order to get a good rise out of your sourdough bread loaf in those first few minutes in the oven, you need a hot and humid environment. Because we are working with home ovens here, the Dutch oven with a lid helps us create that commercial oven vibe by trapping the moisture with its heavy lid. After the first half of your bake is, over you remove the lid to get your loaf that nice caramel colored crust we all love so much.
Step 7: Wait For The Sourdough Loaf to Cool (The Hard Part)
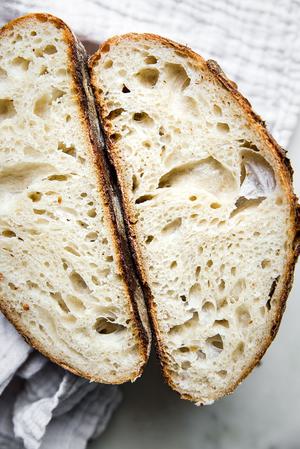
Congratulations, you’ve just made your first loaf of bread! Your house smells amazing and you’re so proud of what your homemade sourdough starter has given you! However, don’t cut into it too fast! The loaf needs to cool outside of the Dutch oven for at least 30 minutes, and ideally more like two hours. When you pull the bread out of the oven, it is still baking inside. Cutting into a loaf too early will stop this process and result in a very gummy loaf. Just wait. Trust us. We speak from (very sad) experience.
Credit Where Credit’s Due!
The measurements in this recipe come from the Josey Baker Bread Cookbook. The book was recommended by a friend who helped set Natalie off on her sourdough journey. While the measurements are the same, the method is our own. Our sourdough bread baking method comes from years of trial and error, and a lot of question asking. While this method makes sense for us and has resulted in many, many perfect loaves, your first loaf may not be totally perfect and that is OK! There is a learning curve to baking sourdough bread. Just stick with it. You’ve got this.

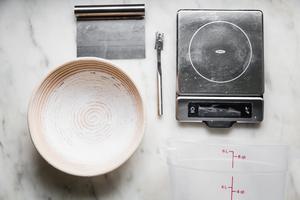
Tools You’ll Need to Make a Loaf of Sourdough Bread:
OK, this looks like a long list. But using the right tools will help ensure that your sourdough bread baking adventure is a success, and after three days of hard work—and much longer if you make your own sourdough starter—you don’t want to take any risks! Here’s what you’ll need to make sourdough bread from scratch:
- A Dutch oven
- A food-grade 6-quart bucket with lid, or a large mixing bowl with a lid
- A lame bread slashing tool, a razor blade or very sharp knife.
- A proofing basket (also called a banneton), or a colander with a tea towel.
- A digital food scale.
- Parchment paper, or you can use cornmeal in a pinch!
- A bench scraper is very handy, but not an absolute must.
A Helpful Sourdough Bread-Making Timeline
Wrapping your head around the timing of bread-making can be a surprising challenge. Making sourdough bread is pretty easy in that there isn’t a lot of active time, but you are required to do something—even if it’s just to give the dough a quick turn-and-fold—every few hours. So we’ve put together a suggested timeline to help you tackle this recipe! Here’s how we usually make this loaf:
Day 1
8:00 am : Feed your starter, to make sure it’s happy and active.
8:00 pm : Make the pre-ferment.
Day 2
8:00 am : Mix the bread dough
2:00 pm : Shape your dough. Now you have two options! You can let the dough rest and rise at room temperature for two hours, and then bake it. OR You could pop the dough in the fridge to rise overnight. If you select option 2, then you’ll bake the dough on....
Day 3
7:00am : You’ll want to refrigerate the dough for 12-24 hours, so assuming you popped your dough in the fridge around 2pm on Day 2, you can bake your bread anytime after you wake up on Day 3.